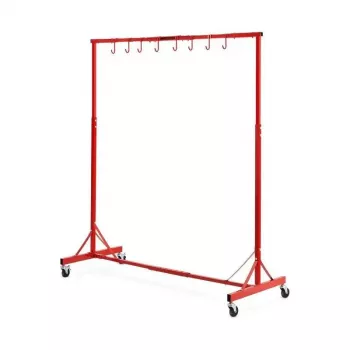
Mobile Auto Paint Drying Rack: Adjustable Hooks & Casters
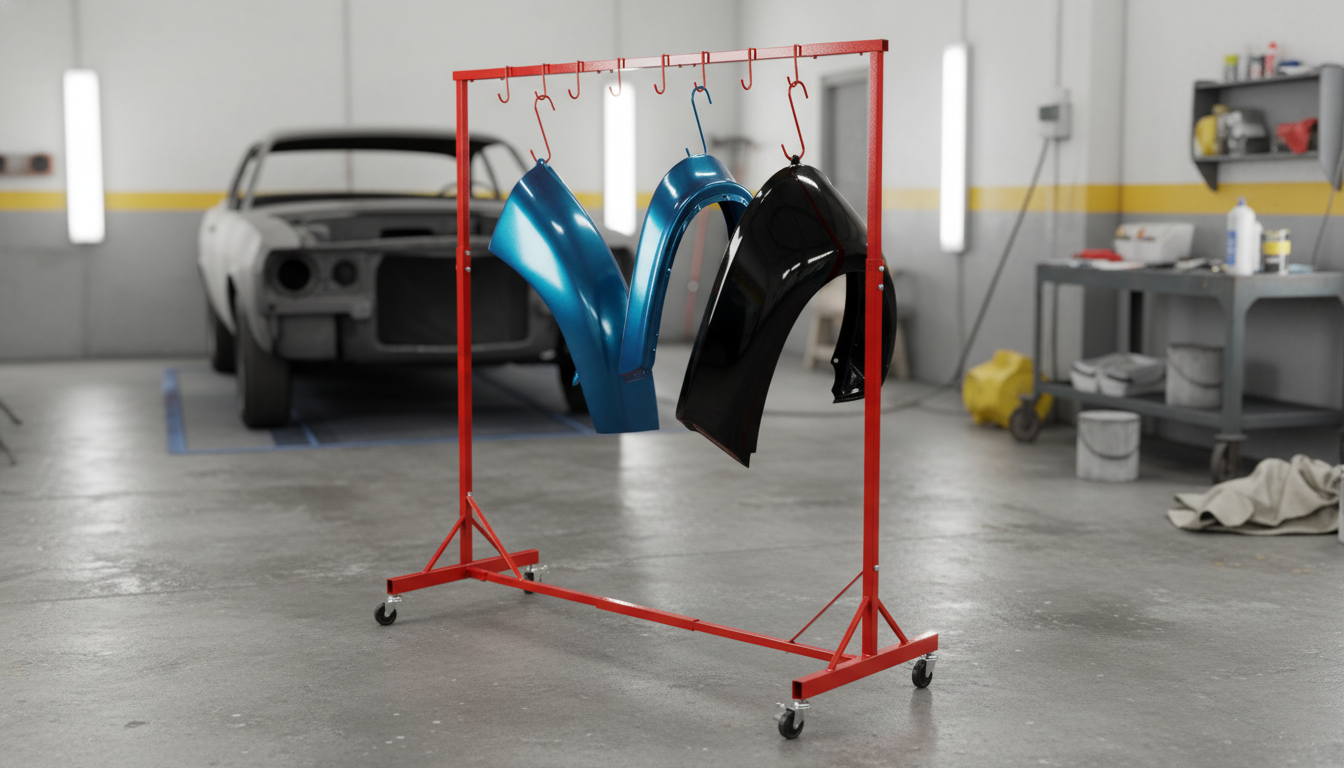
Heavy-Duty Automotive Painting Drying Rack with Adjustable Hooks & Swiveling Wheels
A rolling drying rack helps keep freshly painted parts separated, protected, and easy to move between prep, spray, and cure areas. With adjustable hooks and swiveling wheels, this style of rack is built for flexible hanging layouts and smoother shop workflow when handling bumpers, trim, panels, and other components.
What This Drying Rack Is Used For
When paint is fresh, the biggest risks are contact marks, dust, and accidental bumps during handling. A dedicated hanging rack solves those problems by creating space, airflow, and order—without forcing you to set parts on benches or lean them against walls.
- Hanging freshly painted parts so air can circulate evenly around edges and contours
- Reducing contact points that can cause smudges, imprints, or dust pickup during cure
- Creating an organized staging area for multiple parts (before paint, between coats, and after final coat)
- Making it easier to move parts without carrying them by hand, lowering the chance of accidental damage
For shops that cycle parts through sanding, tack, base/clear, and cure, a mobile rack becomes a “safe zone” where parts live between steps.
Heavy-Duty Frame and Stability
Stability matters as much as capacity. A rack that flexes or rocks can cause parts to sway into each other, especially with long trim pieces or panels. A heavy-duty frame is designed to stay rigid while supporting multiple hanging items and rolling smoothly across the shop.
- Sturdy frame designed to hold multiple hanging items while staying stable during loading and rolling
- Balanced footprint helps minimize tipping when heavier parts are placed on one side
- A rigid structure supports consistent spacing so parts do not swing into each other during movement
- Suitable for repeated shop use where racks are loaded, moved, and reconfigured throughout the day
A practical habit: load heavier items first and distribute the weight across the rack so it tracks straight and doesn’t feel “top heavy” when you turn.
Adjustable Hooks: Flexible Hanging Layouts
Not every job is the same. One day it’s mirror caps and brackets; the next it’s bumper covers and lower valances. Adjustable hooks let you reconfigure spacing quickly so you can keep clearance where it counts—around corners, edges, and freshly cleared surfaces.
- Adjustable hooks allow quick repositioning to match different part sizes and shapes
- Helps maintain clearance between parts to prevent edge-to-edge contact and paint transfer
- Useful for mixing small items (brackets, trim, covers) with larger pieces in the same session
- Encourages consistent orientation so drips or heavy edges can be positioned away from visible surfaces
For best results, decide where each part will hang before spraying so you’re not adjusting hardware with wet paint nearby.
Swiveling Wheels and Shop Mobility
Swiveling wheels are a workflow upgrade: you can steer around tight bays, pivot at booth doors, and rotate the rack to access hooks from multiple sides. That reduces “extra touches” on parts—one of the most common sources of rework.
- Swiveling wheels improve maneuverability in tight bays and around spray booth entrances
- Supports moving parts to safer, less dusty areas for curing without re-handling each piece
- Makes it easier to rotate the rack for access to all sides when loading or unloading
- Best practice: roll slowly, avoid floor debris, and keep heavier parts lower to reduce sway
If the rack ever feels jerky while moving, check the casters—tiny chips and tape scraps can lodge in wheels and create sudden bumps that make hanging parts swing.
Workflow Setup: From Prep to Cure
A rack is most valuable when it’s treated as part of the process, not a last-minute parking spot. Setting the layout early and keeping parts grouped reduces confusion and supports consistent cure conditions.
Pay attention to ventilation and safety requirements in finishing areas. For guidance on spray finishing hazards and controls, review OSHA 29 CFR 1910.107. If you’re trying to reduce exposure to fumes, the EPA overview on VOCs and NIOSH respiratory protection guidance are helpful references.
Preventing Marks, Chips, and Paint Defects
Care, Cleaning, and Long-Term Use
Quick Reference: Features and Practical Benefits
| Feature | Why it matters | Tips for best results |
|---|---|---|
| Heavy-duty frame | Supports multiple parts without flexing | Load heavier parts first and distribute weight evenly |
| Adjustable hooks | Custom spacing and flexible layouts | Set spacing before spraying; keep consistent gaps |
| Swiveling wheels | Easy turning and repositioning | Roll slowly; avoid cords and floor debris |
| Rolling design | Move parts without re-handling | Wait for flash time before relocating the rack |
| Hanging workflow | Reduces contact points during curing | Hang from hidden mounting points when possible |
Recommended In-Stock Shop Picks
- Heavy-Duty Automotive Painting Drying Rack with Adjustable Hooks & Swiveling Wheels
- High-Brightness Rechargeable Waterproof Bike Headlight
- 10W Dual USB Fast Charger Adapter for Smartphones & Travel Use
Who This Rack Fits Best
FAQ
How many parts can be hung on a rolling drying rack at once?
Capacity depends on the size and weight of each part and how much clearance you need to prevent contact. Load heavier pieces first, distribute weight evenly, and leave enough spacing so parts can’t tap together when the rack moves.
Will swiveling wheels make parts swing and touch each other?
They can if the floor is rough or you move too fast, but smooth rolling, slow turns, and proper spacing greatly reduce swinging. Keeping heavier parts lower and clearing caster debris helps maintain steady movement.
How should hooks be positioned to avoid paint defects?
Use clean hooks and hang from hidden mounting holes or backside structure when possible, avoiding freshly painted show edges. Set hook positions before spraying so you’re not making adjustments near wet surfaces.


Leave a comment